Monday, June 13, 2016

Stone Marble Nails

For about the past year, everywhere I look, I see stone marble nails!
I've seen this effect done in so many different ways and in any possible color combination.
Done with gel polish, sharpies and rubbing alcohol, acrylic paint, thinned out nail polish, decals (either ready ones or handmade), stamping (the Nailasaurus has a great tutorial for stamped on marble nails), using plastic wrap, topped with some foils for a more luxurious effect..And the list could probably go on and on..

I don't know about you guys, but I am in LOVE with this effect. I've been flirting with the idea of trying these out for such a long time and now that summer is finally here, it only felt right.


I was going for a classic white and greyish marble look, so I started off with a white nail polish as my base. It really helps if you have a reference picture to look at while you are doing this, so this is what I used.


As far as I know, marbles don't have a flat matte color, they always seem to have some shimmery particles. To give it a realistic look and some depth, I used two sheer shimmery polishes and some scrunched up plastic wrap to randomely dab them on my nails and then sealed it with a fast drying topcoat. One polish was almost clear with a yellow/green shimmer and the other one was a sheer grey with a pink/purple shimmer. Unfortunately, the camera couldn't pick up the shimmer and it seems as if I used a sheer light grey polish for the background.


When that was completely dry, I mixed up some white and black acrylic paint to get a nice grey color and thinned it out with water to a very thin consistency. With a thin nail art brush I made some squiggly lines here and there, some a bit darker than the others..And finally topped it with a fast drying topcoat.


Keep in mind that marbles are natural and like anything coming from nature, each piece is unique. So the more random the lines are, the better. And the little imperfections are what sometimes make it perfect!


I'm really loving stone marble nails and I'd like to experiment with more techniques and colors. I can't wait to find out what works best! If you have tried this effect, I'd love to know what's your favorite technique. :)


Polishes used:

Orly Bonder Rubberized Basecoat
Orly - White Tips
Erre Due - 147
Erre Due - 155
Orly Sec 'N Dry Quick-Dry Topcoat

Monday, April 25, 2016

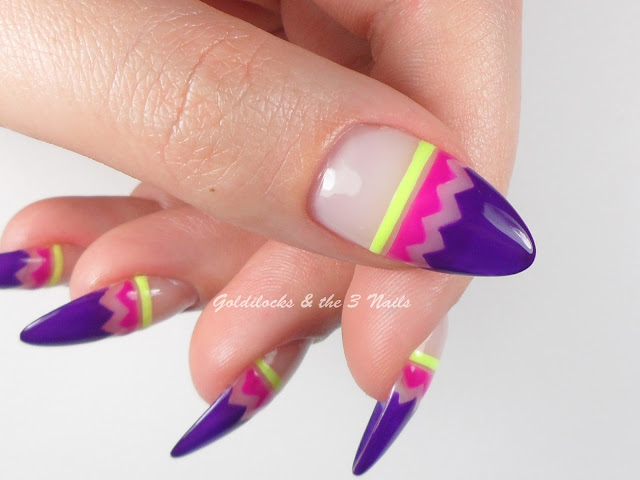
Neon/Negative Space Easter Egg Nails

Before I start talking about this design, I'd like to say a few things first.

1. RESPECT to all the nail artists out there who do magic with striping tape! It might seem like a piece of cake, but I can truly say it takes some serious skills to get a clean, flawless look.

2. RESPECT to all the Wonderwomen who go through every day life with super long nails. I'm struggling while typing this post, not to mention all the other things I have a hard time doing..

After rambling a bit, let's move on to the design..
I was in the mood for vibrant neon colors and thought it would be cool to use some chevron vinyls I had bought on ebay, but never really used. As you might have noticed, I don't normally use striping tape or vinyls for my nail art, maybe only once or twice in total. So I definitely don't consider myself being an expert. It actually took me several tries and a lot of frustration to get the desired look, without everything looking smudged. And I still had some clean up to do before applying my topcoat.
But in the end all went well and I ended up having Neon Easter Egg looking nails with a kick of negative space. It wasn't really my intention, but Easter is in 6 days here in Greece, so it worked out perfectly!! 

Here's a quick how to:
Apply your basecoat and let it dry completely. I'm not wearing basecoat only because I have gel nails on and it's not really necessary. Then place the striping tape/vinyls where you want them and carefully color inside the design you have created. Ideally use polishes that are one coaters, it will make it much easier. Try to remove the tape while the polish is still wet to get more crisp lines and pray while your at it! Maybe do a little dance to the nail art fairies as well! Just kidding.. But if you want to, go ahead! Finally seal with a fast drying topcoat.

And here it is... (drum roll)


Polishes used: 

Orly - Key Lime Twist
Orly - Purple Crush
Orly - Saturated
Orly Sec 'N Dry Quick-Dry Topcoat

Thursday, March 17, 2016

St. Patrick's Day Nail Art

Happy St. Patrick's Day everyone!
Here in Greece we don't actually celebrate this day, but oh well..I thought it would be fun to do a design for the sake of it!

So here it is!! 


I wanted each nail to have a little something, but tried to keep the design pretty simple just so it wouldn't be very time consuming. Now let me break it down for you.
I used a gold glitter polish for my index finger. On my thumb and pinky I used a mint creme polish, a bright emerald green and gold glitter to layer dots on a clear base. On my middle and ring finger I used the mint creme polish as my base, painted little clovers with the emerald green and added a gold four leaf clover on the ring finger for good luck! Finally I topped everything with a fast drying top coat.
That's it!

I hope you all have fun today!! :)

Polishes used:

Orly Bonder Rubberized Basecoat
Orly - Jealous Much
Golden Rose - Rich Color No18
Nails Inc - Chelsea Embankment
Orly Sec 'n Dry Quick-Dry Topcoat

Monday, March 14, 2016

Color the Lines

Do you ever have those days when you're not at your best, but still want your nails to look pretty without trying too hard? Well that's definitely one of those days for me. I'm sick, feeling quite awful and thought that doing my nails would cheer me up! 

I was inspired by a simple design I found on Instagram done by @rosebnails, in which she had painted random black lines on a nude base. So I decided to try this look and give it my own little twist.
And here it is..


I used a pink nude polish as my base and I chose 3 polishes, a red, an iridescent pastel purple and a dark burgundy to paint random lines on all nails. To make it more fun I used a gold glitter polish to make dots on the lines and sealed my design with fast drying top coat.

I chose these colors because I thought they compliment each other, but of course you could choose anything you like for both the base and the lines!

P.S. It's been a long time since I had done a design only with nail polish and my lines aren't as clean and as straight as I'd like them to be..So let's all pretend we don't see that! LOL!

Polishes used:

Orly Bonder Rubberized Basecoat
Orly -  Angel Face
Essie - Lolipop
Essie - She's Picture Perfect
Essie - Sole Mate
Nails Inc - Chelsea Embankment
Orly Sec 'n Dry Quick-Dry Topcoat

Saturday, February 27, 2016

Pusheen Cat Mermaid Nail Art

Hey everyone!
February is almost over and just yesterday I realised that the Pusheen Cat design that I had done for International Cat Day hit 360 pins on Pinerest. As you can imagine I was super excited and since you guys loved it so much I decided to do another one.

This time I was inspired by this picture I found on Instagram.
Isn't it adorable??


And here is my version of it!


For the nails with Pusheen Cat on them, I decided to use a dark petrol polish as my base and for the rest of the nails I wanted to do a mermaid tail look. I thought a gradient would look perfect for this effect and was inspired by Pusheen Cat's mermaid tail colors. So I used a pink polish as my base and with a make up sponge I dabbed the 3 colors (dark petrol, mint, pink) on the nails to create the gradient. I did that 2 times to achieve a nice airbrush look, topped them with a glitter and finally topped all nails with a fast drying top coat.
When all nails were dry I used acrylic paint for the designs and topped them again with fast drying top coat.

I hope you guys like this one as much as my older design. Tell me what you think! :)

Polishes used:

Orly Bonder Rubberized Basecoat
CND Vinylux - Couture Covet
Tommy G - 469
Wet n Wild - I Need a Refresh-Mint
Essence - Space Queen (103)
Orly Sec 'n Dry Quick-Dry Topcoat

Monday, February 1, 2016

Minimal Lines

New year! New month!

Jeez, I've been gone for way too long!
I'm not gonna lie. I was completely out of inspiration the past months and a lot of things were going on that kept me distracted. 

Lately, I've only been wearing plain nail polish on my nails. No nail art whatsoever.
So I decided to make a smooth transition from zero nail art to any form of nail art.
I thought what better than something minimal!

Even though I haven't been posting anything, I still follow all my favorite nail artists and was inspired to do a simple and elegant design from @rosebnails on instagram, in a different color combo.
You know how much I love linework! 
So here it is.


Super easy and there's a ton of color combinations you could try! It's probably the easiest thing to do after dots! You only need a long bristle nail art brush and black acrylic paint or nail polish. I used acrylic paint for the lines because it works better for me and if you make a mistake you can just rub it off with water and a cotton swab before sealing with top coat.

Hope you guys like this and give it a try! 

P.S. I'll do my best not to disappear again for so long! :)

Polishes used:

Orly Bonder Rubberized Basecoat
Orly - Lollipop
Orly Sec 'n Dry Quick-Dry Topcoat